Automating the build and deployment of our team site with Jekyll, GitHub, Travis, S3 and CloudFront
For the last seven years this site has been hosted on GitHub Pages, which is based on Jekyll and used a custom domain. This has been a very fast way to host our site without having to worry about a complex CMS.
Why move it?
The site needed to be fully SSL so we started to look at options. GitHub Pages can run fully SSL under the .io domain, but we wanted to retain our custom domain.
Where did it move to?
We wanted to make sure we could continue to allow all staff to write new posts easily, along with using the latest tools to help us meet our goals. We chose to look at an option that allowed us to have automated builds and publishing, along with redundant storage and CDN-backed delivery.
We wanted builds to be made for all branches to ensure Jekyll completed, but only deployed if the branch was master.
We selected GitHub to host the Jekyll files, Travis CI to push the built site to S3 and finally CloudFront on top with an SSL certificate. Choosing Travis CI to do the build and deploy was something that’s familiar to our team already and utilising Amazon Web Services (AWS) gives us great flexibility. Following great recent successes of moving ~4TB of assets to S3 from on-disk storage for the White Label Dating application and using Route 53 to enhance our DNS resilience, AWS was the perfect choice.
How we got there
All our master branches in GitHub are protected to ensure proper and full code reviews are performed and any required automation occurs.
At a high level, the new development and deployment process looks like this:
- Developer pulls master repo and creates a branch
- Developer makes changes to the site or writes a new post
- Developer tests locally using
bundle exec jekyll serve - Developer pushes branch to GitHub which triggers a Travis CI build (but no deploy)
- Assuming the Travis CI build passes the pull request can be reviewed and then merged
- Once merged to master, another build is done. Travis CI checks the branch name and, as it’s master, also pushes the content to S3 along with creating an invalidation at CloudFront using s3_website.
Notes on deployment choices
- You could use Travis’
deployoption for S3. This is great for shipping the content but you’d then have to installpipand awscli so you could manually call the invalidation. - You could run the build as normal, then, simply use the script deploy
to execute the
s3_website pushbut thanks to how Travis CI goes back to rvm 1.9.3 the ruby version and thus the build and bundle is lost. There is a section on TRAVIS_RUBY_VERSION in the document which may get around this, but, I didn’t test it. - You could use your own deploy scripts. This is simple, obvious, but requires dependencies to be included as part of the Travis CI setup and we wanted to try and keep that as minimal as possible.
The detail
With the following steps, I’m going to assume you have command line experience and some knowledge of AWS services and how it works, but, will include guides elsewhere or commands you can use to carry out the tasks. With nearly all AWS services both command line and web GUI’s can be used. You can find out more about the command line tool on Amazon’s site and there are plenty of guides online.
Jekyll
Firstly you’ll need a Jekyll site.
$ gem install jekyll bundler
$ jekyll new my-example-jekyll-site
$ cd my-example-jekyll-site
$ ~/my-example-jekyll-site $ bundle exec jekyll serve
# => Now browse to http://localhost:4000
S3
You’ll need an S3 bucket, with a static website set up and a policy. You can use s3_website to create that, or you can do it manually. The following is a quick step-by-step guide to do the very basic steps to get the bucket live.
$ aws s3api create-bucket \
  --bucket my-example-jekyll-site \
  --region eu-west-2 \
  --create-bucket-configuration LocationConstraint=eu-west-2
{
    "Location": "http://my-example-jekyll-site.s3.amazonaws.com/"
}
Now you have the bucket to store the files, you can enable the built-in feature to host static websites
and configure the default index document.
$ aws s3 website s3://my-example-jekyll-site/ \
  --region eu-west-2 \
  --index-document index.html
Permissions on S3 buckets are something to which you need to pay close attention. In this case we’re not going to be storing any confidential data so we can open up the permissions to allow general public read access.
$ aws s3api put-bucket-policy \
  --bucket my-example-jekyll-site \
  --region eu-west-2 \
  --policy '{
    "Version": "2012-10-17",
    "Statement": [
        {
            "Sid": "Public access to bucket and all objects",
            "Effect": "Allow",
            "Principal": "*",
            "Action": "s3:GetObject",
            "Resource": "arn:aws:s3:::my-example-jekyll-site/*"
        }
    ]
}'
At this point you can access your site at http://my-example-jekyll-site.s3-webite.eu-west-2.amazonaws.com, although there will be no content. You could choose to upload some content, but as we’re going to be using s3_website for this we’ll carry on.
SSL Certificate
For our SSL certificate we used a free AWS certificate issued via Certificate Manager. You’ll need this set up prior to going to CloudFront or you’ll need whatever certificate/key you are going to be using for your site. I’m not going to cover using importing your own certificate in this post.
If you want to get a free certificate from Amazon, there’s a blog post you can read to find out more. Note that the Certificate Manager is only available in the us-east-1 region.
$ aws acm request-certificate \
--region us-east-1 \
--domain-name my-example-jekyll-site.com \
--subject-alternative-names "www.my-example-jekyll-site.com"
{
    "CertificateArn": "arn:aws:acm:us-east-1:123456789000:certificate/a1a1a1a1-a1a1-a1a1-a1a1-a1a1a1a1a1a1"
}
Make a note of the ARN as you’ll
need it later when you setup the CloudFront distribution. If you don’t, you can always get it back by listing
your certificates using aws acm list-certificates --region us-east-1 (again note you’ll need to be in us-east-1).
If you do the certificate request via the web GUI you’ll get an email automatically for you to approve and have the certificate issued. Via the command line you may need to trigger that approval yourself.
$ aws acm resend-validation-email \
--region us-east-1 \
--certificate-arn "arn:aws:acm:us-east-1:123456789000:certificate/a1a1a1a1-a1a1-a1a1-a1a1-a1a1a1a1a1a1" \
--domain www.my-example-jekyll-site.com \
--validation-domain my-example-jekyll-site.com
When the certificate is approved it’ll be available in Certificate Manager and you’ll be able to use it in CloudFront.
CloudFront Distribution
When you publish your CloudFront setup it’ll take a while to distribute. The same goes for any changes you make down the line. Typically, from my experience, this is between 45-60 minutes.
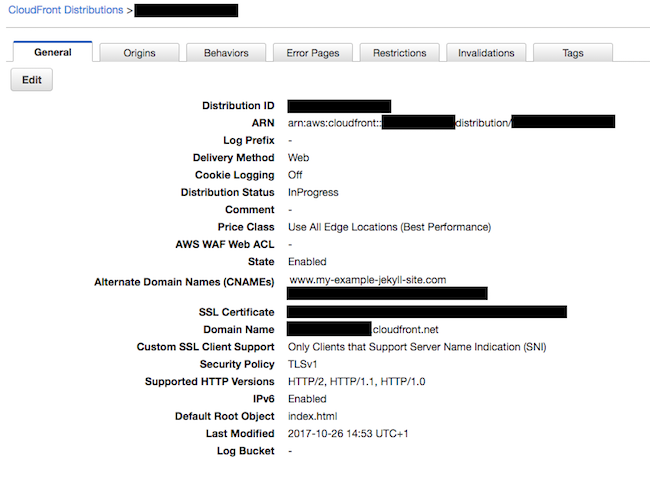
This configuration is the most complicated looking part of this process. It’s arguably quite a bit more simple using the web GUI so I’ll use a couple of screenshots to illustrate what we’re doing on the command line.
I’ll briefly summarise what this configuration is doing, but, it’s much easier to see this via the web GUI.
Summary
- The
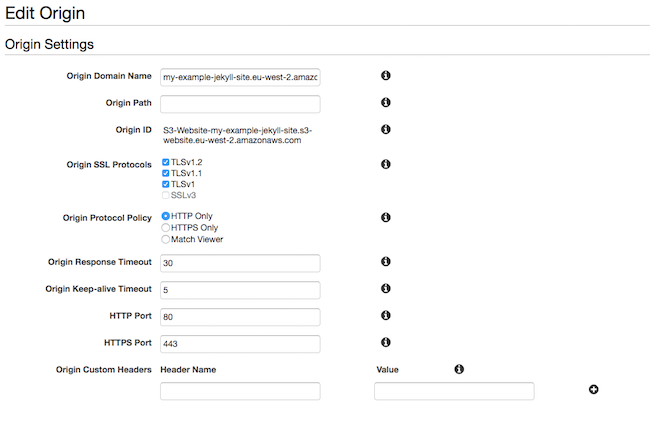
Originssection tells the config where to get its config. This can be via S3 or a custom URL. - The
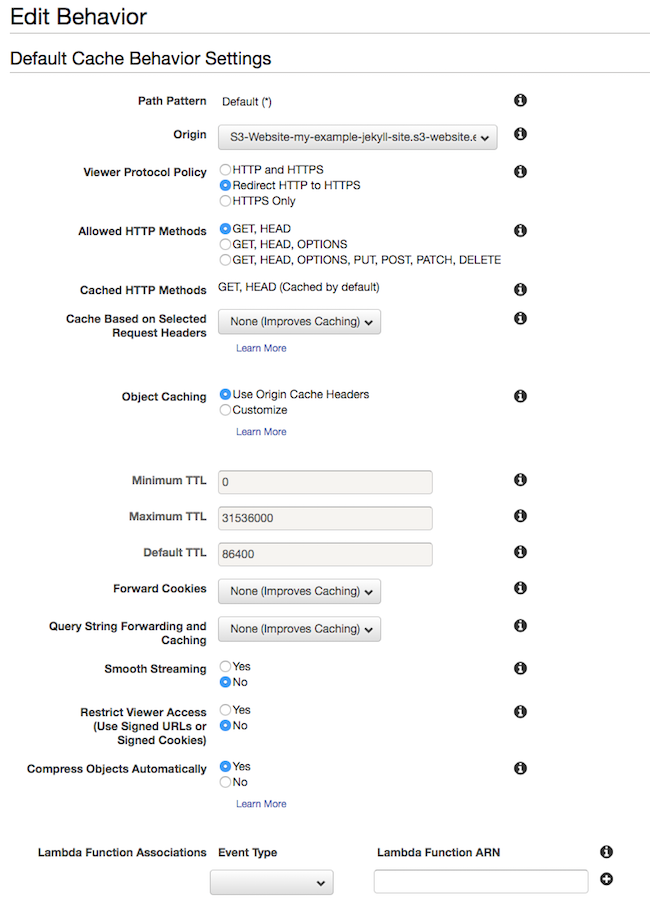
DefaultCacheBehaviorsets up both caching options, but also tells the distribution how to behave with regards to HTTP to HTTPS redirection. - The
ViewerCertificatesection tells it to use the certificate you created earlier. - The
Aliasessection specifies which CNAMEs you’ll be setting in DNS: in our case our custom domain name that we want to retain.
Screenshots of settings
Creating the Distribution
Put the content of the configuration into a file.
$ cat my-example-jekyll-site.json
{
    "Comment": "",
    "CacheBehaviors": {
        "Quantity": 0
    },
    "IsIPV6Enabled": true,
    "Logging": {
        "Bucket": "",
        "Prefix": "",
        "Enabled": false,
        "IncludeCookies": false
    },
    "WebACLId": "",
    "Origins": {
        "Items": [
            {
                "OriginPath": "",
                "CustomOriginConfig": {
                    "OriginSslProtocols": {
                        "Items": [
                            "TLSv1",
                            "TLSv1.1",
                            "TLSv1.2"
                        ],
                        "Quantity": 3
                    },
                    "OriginProtocolPolicy": "http-only",
                    "OriginReadTimeout": 30,
                    "HTTPPort": 80,
                    "HTTPSPort": 443,
                    "OriginKeepaliveTimeout": 5
                },
                "CustomHeaders": {
                    "Quantity": 0
                },
                "Id": "S3-Website-my-example-jekyll-site.s3-website.eu-west-2.amazonaws.com",
                "DomainName": "my-example-jekyll-site.eu-west-2.amazonaws.com"
            }
        ],
        "Quantity": 1
    },
    "DefaultRootObject": "index.html",
    "PriceClass": "PriceClass_All",
    "Enabled": true,
    "DefaultCacheBehavior": {
        "TrustedSigners": {
            "Enabled": false,
            "Quantity": 0
        },
        "LambdaFunctionAssociations": {
            "Quantity": 0
        },
        "TargetOriginId": "S3-Website-my-example-jekyll-site.s3-website.eu-west-2.amazonaws.com",
        "ViewerProtocolPolicy": "redirect-to-https",
        "ForwardedValues": {
            "Headers": {
                "Quantity": 0
            },
            "Cookies": {
                "Forward": "none"
            },
            "QueryStringCacheKeys": {
                "Quantity": 0
            },
            "QueryString": false
        },
        "MaxTTL": 31536000,
        "SmoothStreaming": false,
        "DefaultTTL": 86400,
        "AllowedMethods": {
            "Items": [
                "HEAD",
                "GET"
            ],
            "CachedMethods": {
                "Items": [
                    "HEAD",
                    "GET"
                ],
                "Quantity": 2
            },
            "Quantity": 2
        },
        "MinTTL": 0,
        "Compress": true
    },
    "CallerReference": "my-example-jekyll-site-cli",
    "ViewerCertificate": {
        "SSLSupportMethod": "sni-only",
        "ACMCertificateArn": "arn:aws:acm:us-east-1:123456789000:certificate/a1a1a1a1-a1a1-a1a1-a1a1-a1a1a1a1a1a1",
        "MinimumProtocolVersion": "TLSv1",
        "Certificate": "arn:aws:acm:us-east-1:123456789000:certificate/a1a1a1a1-a1a1-a1a1-a1a1-a1a1a1a1a1a1",
        "CertificateSource": "acm"
    },
    "CustomErrorResponses": {
        "Quantity": 0
    },
    "HttpVersion": "http2",
    "Restrictions": {
        "GeoRestriction": {
            "RestrictionType": "none",
            "Quantity": 0
        }
    },
    "Aliases": {
        "Items": [
            "www.my-example-jekyll-site.com"
        ],
        "Quantity": 2
    }
}
Use that file to create the distribution. Once it completes you’ll get a config back. Note the DomainName as that’s what you’ll need to actually point to your new CloudFront distribution.
$ aws cloudfront create-distribution --distribution-config file://my-example-jekyll-site.json
{
  "Distribution": {
      "Status": "InProgress",
      "DomainName": "abcdef12345678.cloudfront.net",
      "InProgressInvalidationBatches": 0,
      "DistributionConfig": {
        --snip-- contents of my-example-jekyll-site.json --snip--
      },
      "LastModifiedTime": "2017-10-25T13:53:55.768Z",
      "Id": "CLOUDFRONTDID",
      "ARN": "arn:aws:cloudfront::000000000000:distribution/CLOUDFRONTDID"
  },
  "ETag": "CLOUDFRONTDID",
  "Location": "https://cloudfront.amazonaws.com/2017-03-25/distribution/CLOUDFRONTDID"
}
DNS Updates
Now I’m covering this here but you won’t want to do this until you’ve actually got your Jekyll site built and published via Travis CI otherwise you’ll point at a blank site. In our case we set this up in parallel so the first step we did was to drop the TTL our of DNS down to 30s so we could move things around easily.
Your DNS should be set as a CNAME to point at the DomainName item after you created the CloudFront config.
dig +noall +answer CNAME www.my-example-jekyll-site.com
www.my-example-jekyll-site.com.	30	IN	CNAME	abcdef12345678.cloudfront.net.
Manual invalidation
We’ll be using s3_website to handle content invalidation so when the site is published the whole cache is cleared, however you can also do that manually at any time.
$ aws cloudfront create-invalidation \
  --distribution-id CLOUDFRONTDID --paths '/*'
IAM User
As we’ve mentioned we’ll be using s3_website to publish our site so we need a user that can be used for access. We set up a specific build user in IAM with command line access and a policy to allow it to do everything it needed to and to keep it isolated from all our other IAM policies and users.
How you set up access to your S3 bucket and CloudFront is up to you. You can use existing IAM users and policies or if you need a new one (or a basic one) you can follow the steps below. IAM is a large and important topic which I recommend you take some time to understand.
To start our basic access, we’ll need a user.
$ aws iam create-user --user-name site-builder
{
    "User": {
        "UserName": "site-builder",
        "Path": "/",
        "CreateDate": "2017-10-25T10:06:02.105Z",
        "UserId": "AIDAEXAMPLEEXAMPLE00",
        "Arn": "arn:aws:iam::123456789000:user/site-builder"
    }
}
Give this user an access key so they can use the command line tools.
$ aws iam create-access-key --user-name site_builder
{
    "AccessKey": {
        "UserName": "site_builder",
        "Status": "Active",
        "CreateDate": "2017-10-25T10:06:23.262Z",
        "SecretAccessKey": "Aa0Aa0Aa0Aa0Aa0+Aa0Aa0Aa0Aa0Aa0Aa0Aa0Aa0",
        "AccessKeyId": "AKIAEXAMPLEEXAMPLE00"
    }
}
Next you need to create a policy which will allow the user to carry out the tasks we need. For the purpose of this guide that’s manipulating content and performing a purge against CloudFront.
$ aws iam create-policy --policy-name CustomS3SitePublishing --policy-document '{
    "Version": "2012-10-17",
    "Statement": [
        {
            "Effect": "Allow",
            "Action": [
                "s3:ListBucket",
                "s3:GetBucketLocation"
            ],
            "Resource": [
                "arn:aws:s3:::dev.venntro.com",
                "arn:aws:s3:::www.whitelabeldating.com"
            ]
        },
        {
            "Action": [
                "s3:PutObject",
                "s3:DeleteBucketWebsite",
                "s3:PutBucketWebsite",
                "s3:GetObject",
                "s3:DeleteObject",
                "s3:ListObjects"
            ],
            "Effect": "Allow",
            "Resource": [
                "arn:aws:s3:::dev.venntro.com/*",
                "arn:aws:s3:::www.whitelabeldating.com/*"
            ]
        },
        {
            "Action": [
                "cloudfront:CreateInvalidation",
                "cloudfront:ListInvalidations",
                "cloudfront:GetInvalidation"
            ],
            "Effect": "Allow",
            "Resource": "*"
        }
    ]
}'
{
    "Policy": {
        "PolicyName": "CustomS3SitePublishing",
        "CreateDate": "2017-10-25T10:17:24.143Z",
        "AttachmentCount": 0,
        "IsAttachable": true,
        "PolicyId": "ANPAEXAMPLEEXAMPLE00",
        "DefaultVersionId": "v1",
        "Path": "/",
        "Arn": "arn:aws:iam::123456789000:policy/CustomS3SitePublishing",
        "UpdateDate": "2017-10-25T10:17:24.143Z"
    }
}
Lastly you’ll need to attach your new policy to your user. You’ll need to use the ARN from the command you just ran.
$ aws iam attach-user-policy --user-name site-builder --policy-arn arn:aws:iam::123456789000:policy/CustomS3SitePublishings3_website
When I mention environment variables in the next sections these refer to the newly create ones you got from this post or credentials you already have.
Within Travis CI we’ve set up environment variables to take care of the AWS parts we’ll need. Here’s
our s3_website.yml file showing how those are referenced.
s3_id: <%= ENV['AWS_ACCESS_KEY_ID'] %>
s3_secret: <%= ENV['AWS_SECRET_ACCESS_KEY'] %>
s3_bucket: <%= ENV['S3_BUCKET_NAME'] %>
s3_endpoint: <%= ENV['AWS_DEFAULT_REGION'] %>
cloudfront_distribution_id: <%= ENV['CLOUDFRONT_DISTRIBUTION_ID'] %>
cloudfront_invalidate_root: true
cloudfront_wildcard_invalidation: true
Before we push this configuration to Travis CI and have it try to build it, you can (and should) test that the credentials you’ve got actually work. You should get output along the lines of this:
$ export AWS_ACCESS_KEY_ID=XXXXXXXX
$ export AWS_SECRET_ACCESS_KEY=XXXXXXXX
$ export AWS_DEFAULT_REGION=eu-west-2
$ export S3_BUCKET_NAME=my-example-jekyll-site
$ export CLOUDFRONT_DISTRIBUTION_ID=CLOUDFRONTDID

$ bundle exec s3_website push
[info] Downloading https://github.com/laurilehmijoki/s3_website/releases/download/v3.4.0/s3_website.jar into /home/travis/.rvm/gems/ruby-2.4.2/gems/s3_website-3.4.0/s3_website-3.4.0.jar
[info] Deploying /home/travis/build/orgname/my-example-jekyll-site/_site/* to my-example-jekyll-site
[succ] Updated atom.xml (application/xml)
[succ] Updated rss.xml (application/rss+xml)
[succ] Updated feed.xml (application/xml)
[succ] Invalidated 1 item on CloudFront
[info] Summary: Updated 3 files. Transferred 301.6 kB, 297.0 kB/s.
[info] Successfully pushed the website to http://my-example-jekyll-site.s3-website.eu-west-2.amazonaws.com
Travis-CI Configuration
Our .travis.yml file ended up looking like this. We also post all our build notifications to a Slack channel.
language: ruby
cache: bundler
install: bundle install
script: bundle exec jekyll build
after_success:
  - test $TRAVIS_PULL_REQUEST == "false" && test $TRAVIS_BRANCH == "master" && bundle exec s3_website push
notifications:
  email: false
  slack:
    secure: --snip--
Other reading
There’s a few posts and bits of documentation I found useful during this process which are included here for reference:
- Travis CI - Customizing the build
- Travis CI - Script Deployment
- Post build deploy error 127
Conclusion
Now the whole process is live, working well and our team site is secure. It’s being built with Travis CI, pushed to S3 and served securely using CloudFront and a certificate from Certificate Manager.
Orginally published at dev.venntro.com